Note
Estimated time to complete: 20 MINUTES
In the following exercise you will create a Windows VM using Nutanix v3 APIs. In the API body you will include a unattend.xml to allow guest customization. The unattend.xml is base64 encoded. Optionally from Linux you can run “echo <base64-content> | base64 –decode” to see the raw xml.
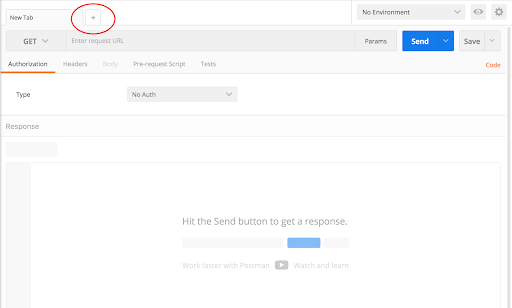
Click + in the main window to create a new tab-window
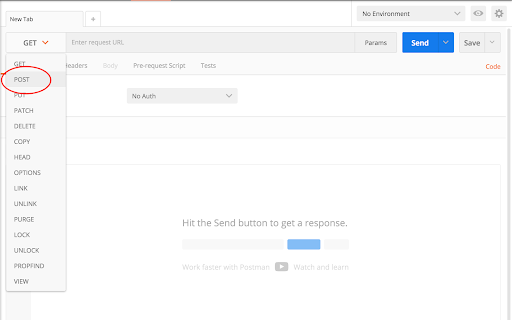
Click the dropdown and select POST
- v3 is RESTful and uses standard HTTP verbs like GET, POST, PUT, DELETE
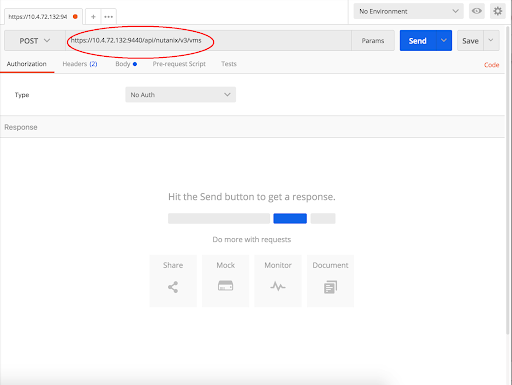
Enter the URL to create a VM
- https://{{prism_central_ip}}:9440/api/nutanix/v3/vms
- v3 exposes semantic URLs to make understanding and using the API easy
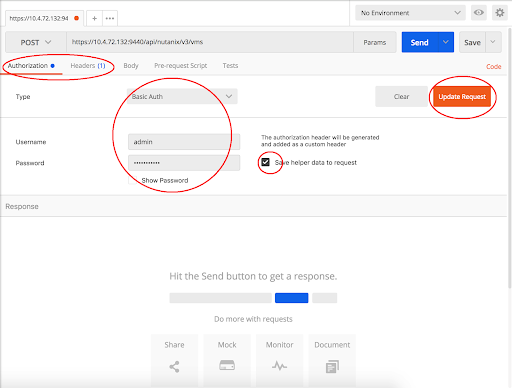
Configure basic authentication for this API call
- Click the Authorization tab and select Basic Auth from the Type dropdown
- Enter Prism credentials of the cluster, and click Update Request:
- Username - admin
- Password - Use the “Prism login password” from handout
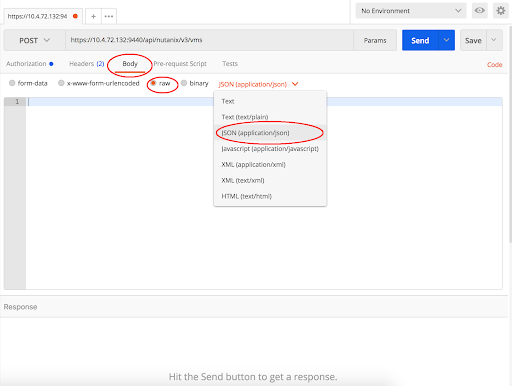
Set the media type to application/json
- Click the Body tab
- Select the radio button for raw
- Click the Text dropdown and select JSON (application/json)
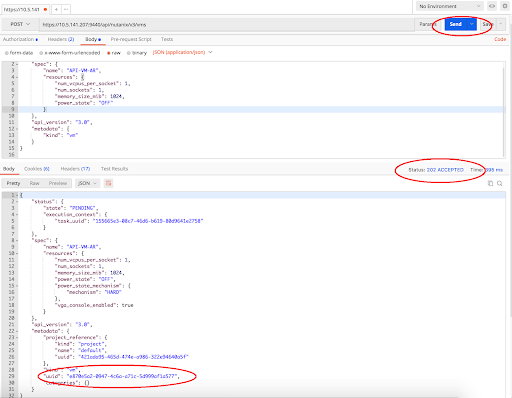
Fill out the body
- Copy or type the following JSON as the VM intent input
{

"spec":{

"name":"win-sysprep-postman-<initial>",

"resources":{

"nic_list":[

{

"nic_type":"NORMAL_NIC",

"network_function_nic_type":"INGRESS",

"subnet_reference":


{ "kind":"subnet", "uuid":"<subnetuuid>" }

}

],

"boot_config":{

"boot_device":{

"disk_address":


{ "device_index":0, "adapter_type":"SCSI" }

}

},

"num_vcpus_per_socket":1,

"num_sockets":1,

"memory_size_mib":1024,

"power_state":"ON",

"guest_customization":{

"sysprep":


{ "install_type":"PREPARED", "unattend_xml":"PD94bWwgdmVyc2lvbj0iMS4wIiBlbmNvZGluZz0idXRmLTgiPz4NCiAgICA8dW5hdHRlbmQgeG1sbnM9InVybjpzY2hlbWFzLW1pY3Jvc29mdC1jb206dW5hdHRlbmQiPg0KICAgICAgICA8c2V0dGluZ3MgcGFzcz0ib29iZVN5c3RlbSI+DQogICAgICAgICAgICA8Y29tcG9uZW50IG5hbWU9Ik1pY3Jvc29mdC1XaW5kb3dzLVNoZWxsLVNldHVwIiBwcm9jZXNzb3JBcmNoaXRlY3R1cmU9ImFtZDY0IiBwdWJsaWNLZXlUb2tlbj0iMzFiZjM4NTZhZDM2NGUzNSIgbGFuZ3VhZ2U9Im5ldXRyYWwiIHZlcnNpb25TY29wZT0ibm9uU3hTIiB4bWxuczp3Y209Imh0dHA6Ly9zY2hlbWFzLm1pY3Jvc29mdC5jb20vV01JQ29uZmlnLzIwMDIvU3RhdGUiIHhtbG5zOnhzaT0iaHR0cDovL3d3dy53My5vcmcvMjAwMS9YTUxTY2hlbWEtaW5zdGFuY2UiPg0KICAgICAgICAgICAgICAgIDxVc2VyQWNjb3VudHM+DQogICAgICAgICAgICAgICAgICAgIDxBZG1pbmlzdHJhdG9yUGFzc3dvcmQ+DQogICAgICAgICAgICAgICAgICAgICAgICA8VmFsdWU+TnV0YW5peDEyMyM8L1ZhbHVlPg0KICAgICAgICAgICAgICAgICAgICAgICAgPFBsYWluVGV4dD50cnVlPC9QbGFpblRleHQ+DQogICAgICAgICAgICAgICAgICAgIDwvQWRtaW5pc3RyYXRvclBhc3N3b3JkPg0KICAgICAgICAgICAgICAgICAgICA8TG9jYWxBY2NvdW50cz4NCiAgICAgICAgICAgICAgICAgICAgICA8TG9jYWxBY2NvdW50IHdjbTphY3Rpb249ImFkZCI+DQogICAgICAgICAgICAgICAgICAgICAgICAgPFBhc3N3b3JkPg0KICAgICAgICAgICAgICAgICAgICAgICAgICAgIDxWYWx1ZT5OdXRhbml4MTIzIzwvVmFsdWU+DQogICAgICAgICAgICAgICAgICAgICAgICAgICAgPFBsYWluVGV4dD50cnVlPC9QbGFpblRleHQ+DQogICAgICAgICAgICAgICAgICAgICAgICAgPC9QYXNzd29yZD4NCiAgICAgICAgICAgICAgICAgICAgICAgICA8RGVzY3JpcHRpb24+VGVzdCBhY2NvdW50PC9EZXNjcmlwdGlvbj4NCiAgICAgICAgICAgICAgICAgICAgICAgICA8RGlzcGxheU5hbWU+TnV0YW5peDwvRGlzcGxheU5hbWU+DQogICAgICAgICAgICAgICAgICAgICAgICAgPEdyb3VwPkFkbWluaXN0cmF0b3JzO1Bvd2VyIFVzZXJzPC9Hcm91cD4NCiAgICAgICAgICAgICAgICAgICAgICAgICA8TmFtZT5OdXRhbml4PC9OYW1lPg0KICAgICAgICAgICAgICAgICAgICAgIDwvTG9jYWxBY2NvdW50Pg0KICAgICAgICAgICAgICAgICAgICA8L0xvY2FsQWNjb3VudHM+DQogICAgICAgICAgICAgICAgPC9Vc2VyQWNjb3VudHM+DQogICAgICAgICAgICAgICAgPE9PQkU+DQogICAgICAgICAgICAgICAgICAgIDxIaWRlRVVMQVBhZ2U+dHJ1ZTwvSGlkZUVVTEFQYWdlPg0KICAgICAgICAgICAgICAgIDwvT09CRT4NCiAgICAgICAgICAgIDwvY29tcG9uZW50Pg0KICAgICAgICAgICAgPGNvbXBvbmVudCBuYW1lPSJNaWNyb3NvZnQtV2luZG93cy1JbnRlcm5hdGlvbmFsLUNvcmUiIHByb2Nlc3NvckFyY2hpdGVjdHVyZT0iYW1kNjQiIHB1YmxpY0tleVRva2VuPSIzMWJmMzg1NmFkMzY0ZTM1IiBsYW5ndWFnZT0ibmV1dHJhbCIgdmVyc2lvblNjb3BlPSJub25TeFMiIHhtbG5zOndjbT0iaHR0cDovL3NjaGVtYXMubWljcm9zb2Z0LmNvbS9XTUlDb25maWcvMjAwMi9TdGF0ZSIgeG1sbnM6eHNpPSJodHRwOi8vd3d3LnczLm9yZy8yMDAxL1hNTFNjaGVtYS1pbnN0YW5jZSI+DQogICAgICAgICAgICAgICAgPElucHV0TG9jYWxlPmVuLVVTPC9JbnB1dExvY2FsZT4NCiAgICAgICAgICAgICAgICA8U3lzdGVtTG9jYWxlPmVuLVVTPC9TeXN0ZW1Mb2NhbGU+DQogICAgICAgICAgICAgICAgPFVJTGFuZ3VhZ2U+ZW4tVVM8L1VJTGFuZ3VhZ2U+DQogICAgICAgICAgICAgICAgPFVzZXJMb2NhbGU+ZW4tVVM8L1VzZXJMb2NhbGU+DQogICAgICAgICAgICA8L2NvbXBvbmVudD4NCiAgICAgICAgPC9zZXR0aW5ncz4NCiAgICAgICAgPHNldHRpbmdzIHBhc3M9InNwZWNpYWxpemUiPg0KICAgICAgICAgICAgPGNvbXBvbmVudCBuYW1lPSJNaWNyb3NvZnQtV2luZG93cy1TaGVsbC1TZXR1cCIgcHJvY2Vzc29yQXJjaGl0ZWN0dXJlPSJhbWQ2NCIgcHVibGljS2V5VG9rZW49IjMxYmYzODU2YWQzNjRlMzUiIGxhbmd1YWdlPSJuZXV0cmFsIiB2ZXJzaW9uU2NvcGU9Im5vblN4UyIgeG1sbnM6d2NtPSJodHRwOi8vc2NoZW1hcy5taWNyb3NvZnQuY29tL1dNSUNvbmZpZy8yMDAyL1N0YXRlIiB4bWxuczp4c2k9Imh0dHA6Ly93d3cudzMub3JnLzIwMDEvWE1MU2NoZW1hLWluc3RhbmNlIj4NCiAgICAgICAgICAgICAgICA8Q29tcHV0ZXJOYW1lPkNhbG08L0NvbXB1dGVyTmFtZT4NCiAgICAgICAgICAgICAgICA8UmVnaXN0ZXJlZE9yZ2FuaXphdGlvbj5OdXRhbml4PC9SZWdpc3RlcmVkT3JnYW5pemF0aW9uPg0KICAgICAgICAgICAgICAgIDxSZWdpc3RlcmVkT3duZXI+QWNyb3BvbGlzPC9SZWdpc3RlcmVkT3duZXI+DQogICAgICAgICAgICAgICAgPFRpbWVab25lPlBhY2lmaWMgU3RhbmRhcmQgVGltZTwvVGltZVpvbmU+DQogICAgICAgICAgICA8L2NvbXBvbmVudD4NCiAgICAgICAgPC9zZXR0aW5ncz4NCiAgICA8L3VuYXR0ZW5kPg==" }

},

"disk_list":[

{

"data_source_reference":


{ "kind":"image", "uuid": "<diskimageuuid>" }

,

"device_properties":{

"disk_address":


{ "device_index":0, "adapter_type":"SCSI" }

,

"device_type":"DISK"

}

}

]

}

},

"api_version":"3.0",

"metadata":{

"kind":"vm",

"categories":


{ "Project":"default" }

}

}
- Required edits to above body
- Change the VM’s name to add your initials at the end of VM name. Replace <initial> with your initials.
- Change the subnet UUID to a valid subnet UUID on your cluster. Replace <subnetuuid>
- Change the disk image to the UUID of the Windows 2016 image. Replace <diskimageuuid>
Click Send to submit the v3 API call
v3 provides a precise HTTP status and replies with the relevant intent response
Check it out in the Prism UI
- Open a web browser to https://{{prism_central_ip}}:9440/console/
- Enter the Prism Username and Password displayed in your lab handout to log in
- Type the f key or click the search icon to open the search bar on the header
- Enter the name of your VM (hint: your Initials)
- Click on your VM in the table and click the Launch Console button under the table
- A window will appear for the CentOS login prompt